How do I transfer my data to Potentiality for upload?
Related Topic:
What are member IDs and do I need to supply them?
How do I add new user record(s) onto my online community?
Uploading Data to Potentiality
To ensure that your data is protected at all times, we ask that all clients use our secure file upload tool to transfer their data across to us, whether this is for a new site build or general data migration.
Timeline: We recommend that you send us your data as soon as possible to avoid any unnecessary delays.
For new site data migrations, once we have reviewed the data, asked questions and you have confirmed that you are happy for us to import - it will take approximately 8 weeks to migrate data for this point. 
For general data migrations e.g. annual migrations, we will try to accommodate deadlines. However, allow 6 weeks or more where possible as we need to fit these tasks into our workflow.
NOTE: Please NEVER send data to us via an email or via our internal ticketing support platform.
Data files are predominately uploaded in an Excel format. However we can accept many different formats, please contact us if you need further information on which formats we accept.
For larger data migrations from existing databases, you may wish to send us a backup file directly from whichever system you use. If you decide to send a spreadsheet(s), please provide us with all the information that you would like to be able to access and use within Potentiality, see Selecting the database fields for your new Potentiality database for more information.
The minimum details required are usually name, dob, peer year, email and student id.
BEFORE sending data, please ensure the following:
ALWAYS include a column for Student (and/or other) UNIQUE ID numbers (where they exist). NB: If no ID number is included, then it will be assumed that the records do not currently exist on the site and new records will be created with Potentiality assigning a new ID number upon importing. Conversely: if an ID number is included and that ID number matches an existing record on the site, then it will be assumed that you wish to overwrite the existing data with the data on the sheet.
Names should be broken into "First Name" and "Last Name" columns
Please include a column for "peer year" (class of) if your file contains alumni records and we recommend a "Group" column is included if you want to distinguish between member types e.g. Alumni/Parents/Staff etc.
Ensure email addresses are in a valid format.
Please ensure any dates, such as dates of birth, are in the accepted format of DD-MM-YYYY.
Addresses should be broken into appropriate columns (street, town, city, country, postcode, etc.).
NB: If you do include addresses - make sure that they are aligned correctly e.g. towns are all in the town fields, postcodes are in the postcode fields, etc. (otherwise your search results will not be as accurate as they should be).
To upload data to Potentiality:
There are two recommended methods of sending data across to us. The method you choose will depend upon whether you have access to a Potentiality site or not.
Choose if you are a new client and your site has not been built yet.
Choose if you are an existing client with Potentiality log in details to access the admin tools menu.
Data Transfer Option 1
Click on this link https://eu.ptly.com/API/PtlyFileUploader.aspx to access our secure file upload tool or alternatively, copy and paste the URL into your browser.
The screen below will be displayed:


Click Choose Files. Locate the file on your computer. Select the file(s) that you wish to upload then click Open or double-click on the relevant file.
You will be returned to the screen below. Please enter the requested details.


Click Upload File (in the top right hand corner of the screen). A confirmation will appear at the bottom of the screen to let you know that your data has been uploaded successfully and you will receive an email confirmation shortly after the upload.
Please raise a support ticket to let us know that you have sent across the file and/or whether you have any special requirements or upload deadlines.
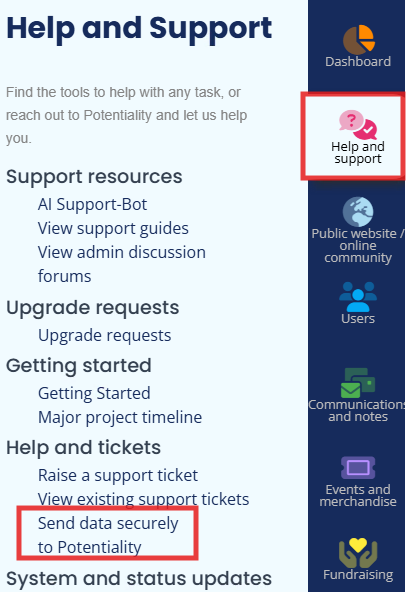
Data Transfer Option 2
Please log into your Potentiality site.
Go to Help and Support > Send data securely to Potentiality via the admin tools menu (found on the left hand side of your screen). See below:
- The following screen will display:

Click Choose Files. Locate the file on your computer. Select the file(s) that you wish to upload then click Open or double-click on the relevant file.
You will be returned to the screen below. Please enter the requested details.

Click Upload File (in the top right hand corner of the screen). A confirmation will appear at the bottom of the screen to let you know that your data has been uploaded successfully and you will receive an email confirmation shortly after the upload.
Please raise a support ticket to let us know that you have sent across the file and/or whether you have any special requirements or upload deadlines.
sub-pages
0 0